
Introduction
Free Fire Battle Royale, your custom HUD setup plays a major role in how well you perform in matches. The layout of your controls directly affects your movement speed, shooting accuracy, and overall gameplay response. Many players underestimate this, but a properly arranged 2-finger control layout can make the difference between a quick elimination and a Booyah victory in Free Fire.
A poorly configured HUD may cause slow reactions, poor aim, or confusion during intense fights, especially for players switching between Android and iOS devices. On the other hand, the best-optimized 2-finger setup improves your mobility, reflexes, and combat control in both ranked and classic modes.
There has always been debate among players about whether 4-finger claw controls outperform 2- or 3-finger layouts. While the 4-finger setup allows faster multitasking, skilled Free Fire players can still dominate matches using only two fingers. With the right sensitivity and layout, you can aim, crouch, jump, and fire almost simultaneously.
This guide will explain everything about creating and mastering the 2-finger HUD layout for this game, suitable for any smartphone or tablet (except iPad).
Why Choose the 2-Finger Layout?
The 2-finger control setup in this game offers simplicity, comfort, and precision. It allows players to focus more on movement and aim rather than managing too many controls at once. Many pro players prefer it because it gives consistent accuracy and control, especially during close-range fights or quick rotations in Battle Royale mode.
A 2-finger layout lets you react faster during sudden enemy encounters. You can smoothly combine actions like aiming, throwing grenades, switching weapons, or dropping a gloo wall, all while moving. This level of fluidity helps in both ranked and casual matches.
In Free Fire, around half of the player community uses 2-finger controls because it’s easier to master and works well across different screen sizes. It’s also perfect for players who play on smaller devices or don’t want to overstretch their fingers.
(NOTE:) For the best performance, don’t copy others’ HUDs blindly. Adjust your button positions and sizes according to your screen size, thumb reach, and comfort level.
Understanding the 2-Finger Setup
For Android and iOS Here is Best 2-Finger in Free Fire Custom HUD
The 2-finger control layout relies mainly on your left thumb and right thumb — both responsible for nearly all in-game actions. While this may sound limiting, it actually creates a smoother rhythm once your muscle memory develops.
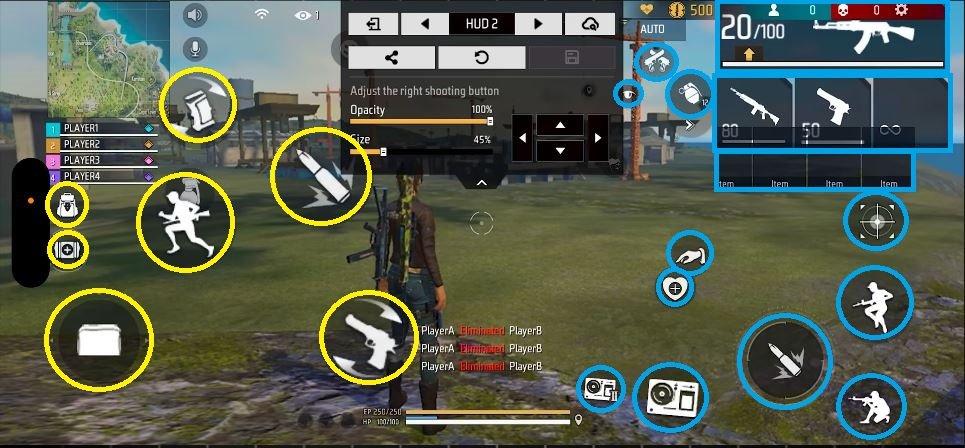
1. Left Thumb Role
The left thumb primarily manages movement, joystick control, running, backpack access, reloading, using medkits, placing gloo walls, and sometimes the left-side fire button. It’s also used for exchanging weapons and quick item selection.
Make sure your joystick and gloo wall buttons are placed comfortably within your thumb range. Too large or too small button sizes can slow down reactions during a fight.
(NOTE:) Adjust the button opacity and size according to your preference, but avoid changing their positions too often. This can disrupt muscle memory and make gameplay inconsistent.
2. Right Thumb Role
The right thumb is the powerhouse of your control setup. It handles aiming, jumping, crouching, looting, scoping, grenade throws, revives, and the main fire button. It’s also responsible for quick camera movement during fights.
In Free Fire, this thumb determines how accurately you can drag your aim and control recoil during gunfights. Good placement ensures faster reaction in both short- and long-range battles.
(NOTE:) Place your jump and crouch buttons near the fire button to perform quick movements, such as jump-shots or crouch-shots, in close combat.
Left and Right Fire Buttons in Free Fire
Both fire buttons serve different combat purposes. The left-side fire button is excellent for continuous shooting while maintaining movement — ideal when strafing or dragging aim. The right-side fire button, on the other hand, helps you maintain precision while scoped in mid- or long-range duels.
Using both strategically can give a serious edge during 1v1 fights or ranked matches.
(NOTE:) Use the right fire button when using a sniper or AR for long-range fights, and the left fire button when using SMGs or shotguns for close-quarters combat.
Tips for Mastering the 2-Finger Claw Setup
Train Daily: Spend 15–20 minutes in training mode to build muscle memory for your finger placement and button timing.
Start in Unranked: Practice in Clash Squad or unranked matches before entering ranked battles to avoid losing points.
Adjust Gradually: Make minor changes in button size, opacity, and position until you find your most comfortable layout.
Learn from Mistakes: Watch replays or record matches to identify where your control setup may need tweaking.
(NOTE:) Don’t switch your HUD too frequently. Consistency is key to mastering your control setup in Free Fire Battle Royale.
Addition, you can read:
Aim Lock in Free Fire: Get Master to Perfect Headshots
Powerfull Guns in Free Fire: Ranking the Top 10
Conclusion
The 2-finger custom HUD layout in Free Fire Battle Royale remains one of the most balanced and effective control styles for both Android and iOS users. It offers excellent comfort, control precision, and flexibility for players of all skill levels. With the right sensitivity settings, practice, and understanding of your HUD, you can achieve top-tier performance without needing a complicated claw setup.