Introduction
The 3 Claw, commonly called the 3-fingers control in Free Fire, plays a vital role in enhancing your performance in every match. In Free Fire Battle Royale, your custom HUD (Heads-Up Display) determines not only how quickly you move and aim but also how responsive your gameplay feels. Many players overlook this, yet a well-designed 3-finger layout can mean the difference between a swift elimination and securing a Booyah!
A poorly arranged HUD may slow down your reactions, reduce accuracy, or create confusion during intense firefights, especially when switching between Android and iOS devices. Conversely, an optimized 3-finger HUD improves movement, reflexes, and combat control, whether you’re playing ranked or classic matches.
There is ongoing debate about which setup 2, 3, or 4-finger claw is best. While 4-finger controls allow faster multitasking, many skilled Free Fire players excel with only three fingers. With the right sensitivity and layout, you can aim, crouch, jump, and fire almost simultaneously. The 3-finger setup is often considered balanced and highly effective, offering a mix of precision and comfort. Ultimately, it comes down to personal preference, but players using 3-finger controls frequently perform consistently well.
This guide will walk you through creating and mastering the 3-finger HUD layout for Free Fire, suitable for smartphones and most tablets.
Why Choose the 3 Claw Layout in Free Fire?
The 3rd Claw layout in Free Fire is popular for its simplicity, comfort, and precision. It allows players to focus more on aiming and movement rather than managing too many buttons simultaneously. Many professional players prefer it because it provides consistent control, especially in fast-paced close-range fights or when rotating quickly across the map.
Using a 3-finger layout enables faster reactions during surprise enemy encounters. Actions like aiming, throwing grenades, switching weapons, or placing a gloo wall can be executed smoothly while moving, giving players a tactical advantage in both ranked and casual matches.
About half of Free Fire’s player base uses 2-finger controls, as they are easier to master and suit various screen sizes. However, the 3-finger layout is perfect for players who want better mobility without overstretching their fingers.
NOTE: Avoid copying someone else’s HUD exactly. Customize button positions and sizes according to your screen, thumb reach, and comfort for the most effective performance.
Understanding the 3rd Claw Setup
The 3-finger layout primarily uses the left thumb, right thumb, and right index finger to handle nearly all in-game actions. This setup is designed for mobile play and is not suited for PC users. Mastering this control scheme helps you react faster and maintain precision during fights.
Perfect 3 Claw/3-Fingers Custom HUD in Free Fire for iOS and Android
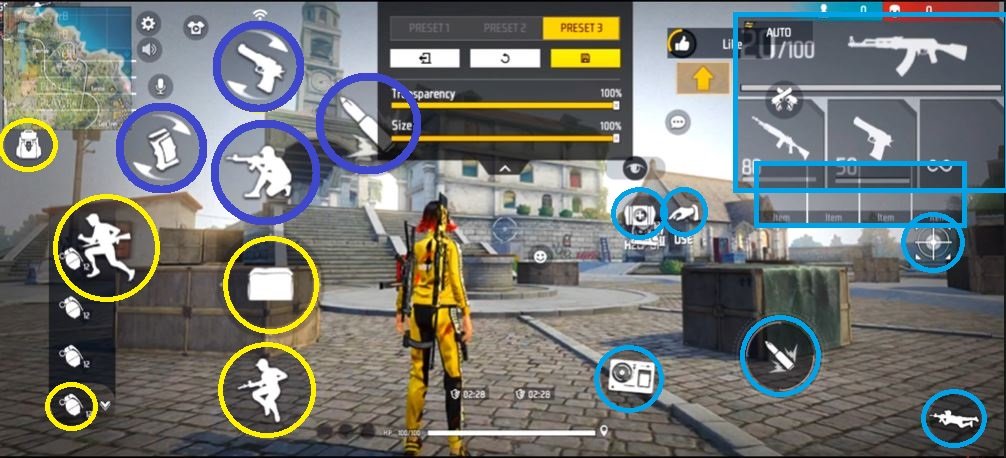
1. Left Thumb Role
The left thumb is responsible for essential movement controls such as the joystick, running, jumping, throwing grenades, and placing gloo walls.
NOTE: The left thumb plays a crucial role in constant in-game actions. Ensuring comfort and accessibility for these buttons is key to maintaining smooth movement and combat efficiency.
2. Left Index Finger
The left index finger manages crouching, switching weapons, firing from the right-side button, and reloading.
NOTE: Correct positioning of the index finger ensures quick reactions in sudden combat situations, especially during intense mid-range firefights.
3. Right Thumb Role
The right thumb handles aiming down sights (ADS), firing, using medkits, looting, and activating character abilities. It also covers prone, gun selection, and interacting with mid-game items.
NOTE: Right-thumb placement is critical for multitasking actions efficiently. A slight misalignment can slow your response in high-pressure encounters.
Mastering the 3-Finger Claw Setup

To become proficient with the 3-finger layout, consistent practice is essential. Spend 10–15 minutes daily in training mode to build muscle memory for finger placement and button timing. Begin with unranked matches or Clash Squad mode to familiarize yourself with movements before competing in ranked battles.
Gradually adjust button sizes, opacity, and positions until the layout feels natural. Analyze match replays to identify mistakes and refine your control setup.
NOTE: Avoid frequently switching HUD layouts. Consistency is crucial for mastering your 3-finger controls and improving performance in Free Fire Battle Royale.
Addition, you can read:
Best Gun Combinations in Free Fire: Top 3 All-Time Favorites
Be A Pro Player In Free Fire: With Top 10 Effective Tips
Conclusion
A well-optimized 3-finger or claw HUD can dramatically improve your Free Fire gameplay. By understanding each finger’s role and practicing consistently, you can achieve smoother movements, faster reactions, and more precise actions. Customizing your layout to match your personal comfort ensures long-term improvement and better in-game performance